
页面加载中,请稍候
来源:开源Linux发布时间:2022-12-131703浏览
询问 AI
来源:网络技术联盟站
我们访问Zabbix官网https://www.zabbix.com/看到Zabbix最新版本是6.2:
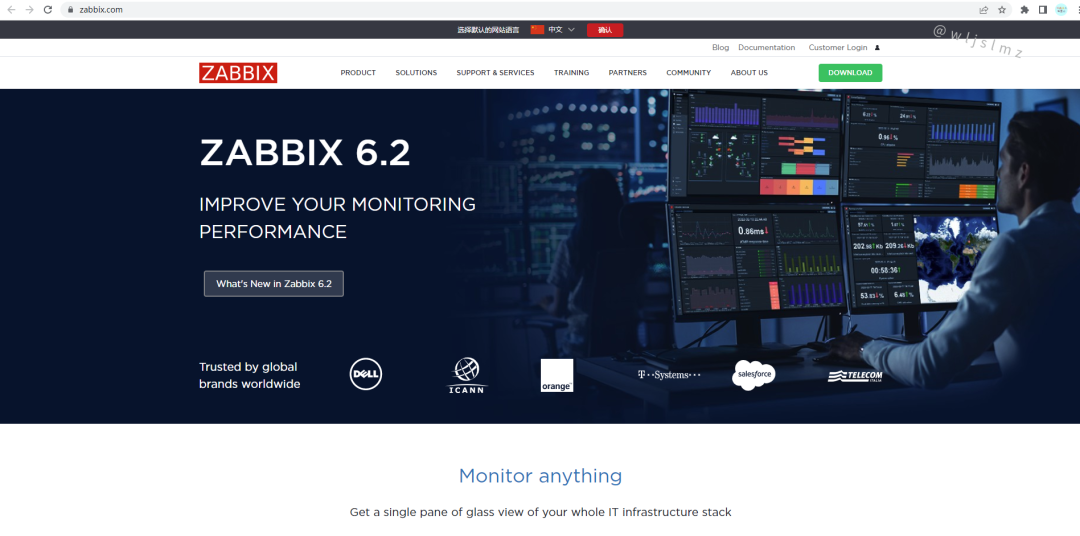
所以本文的宗旨就是介绍一下Zabbix6.2新特性,以及如何部署Zabbix6.2。
Zabbix是一个成熟、易用的企业级开源监控解决方案,适用于百万级指标的网络监控和应用监控。
官网地址在文章开头说过了,下面是中文版的:
https://www.zabbix.com/cn/

Zabbix专有词汇:
Zabbix程序组件:
Zabbix 6.2将又一次提升新用户和资深用户的用户体验,主要通过一系列的UI/UX优化、新监控项和配置选项以及中大型环境部署的性能优化。
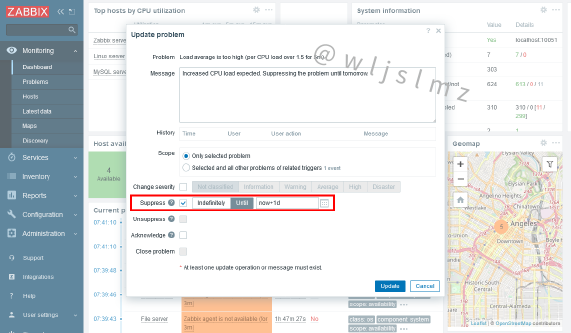
Zabbix管理员现在可以通过抑制不相关的问题来隐藏它们:

除了以前支持的HashiCorp vault之外,Zabbix 6.2还官方支持在CyberArk vault中存储机密信息:
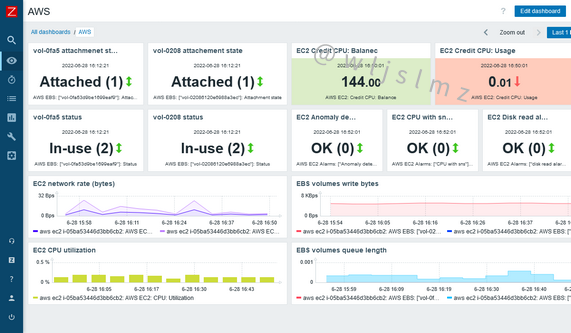
使用正式的Zabbix AWS EC 2模板监控AWS EC2实例和附加的AWS EBS volumes:
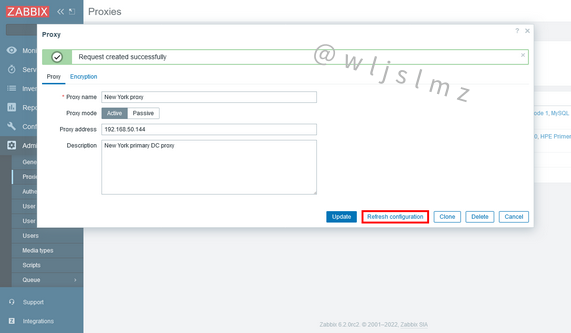
Zabbix proxy管理从未如此简单!现在,proxy配置可以立即从Zabbix前端重新加载:
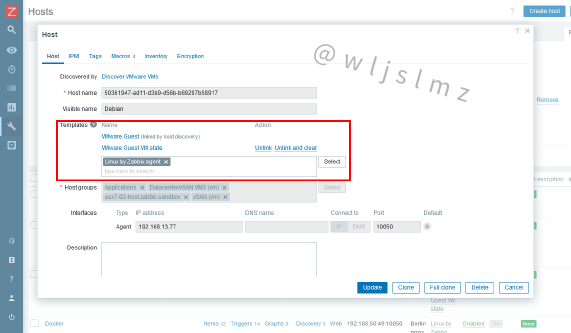
从主机原型中发现的主机现在支持手动编辑模板、标签和用户宏:
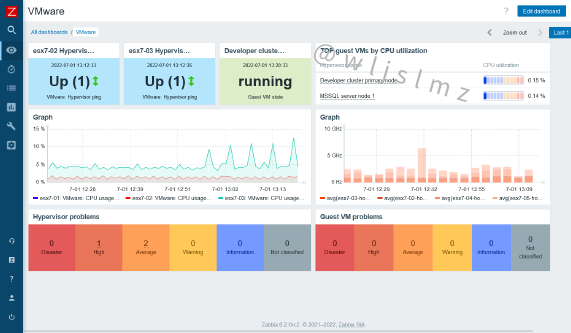
现在可以进一步修改使用Zabbix VMware监控功能创建的主机:
VMware 监控已扩展到支持许多新监控项和低级别自动发现规则。这可以监控新的指标,例如:
现在可以根据VMware主机的电源状态对其进行筛选。
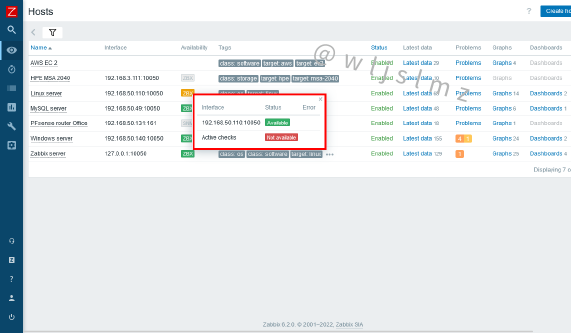
当鼠标悬停在Zabbix agent界面图标上时,现在可以观察到Zabbix active agent检查状态:
Zabbix server现在只接收最新的配置更改,而不是定期重新加载完整的Zabbix配置数据:
初始监控项检查逻辑已得到优化,新创建的监控项在创建后一分钟内收到其第一个指标,而不是在监控项更新间隔内的随机时间点进行检查:
新引入的用户宏缓存减少了配置缓存锁定,因此提高了Zabbix的总体性能:
Zabbix库结构的多项更改:
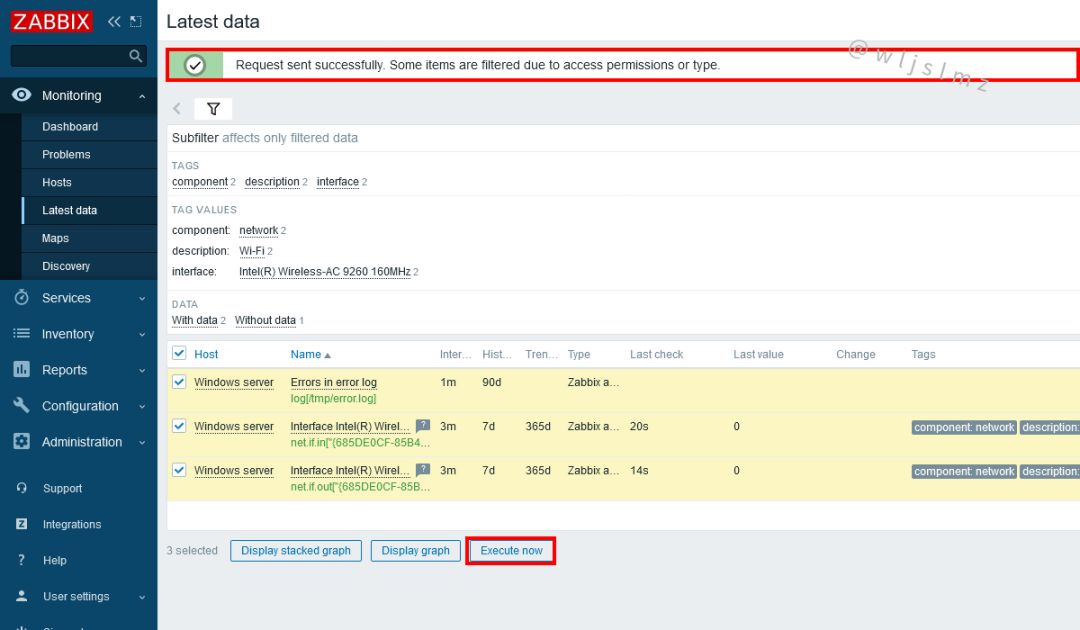
之前用于立即检索指标的execute now(立即执行)按钮,现在可从Latest data (最新数据)页面获得:
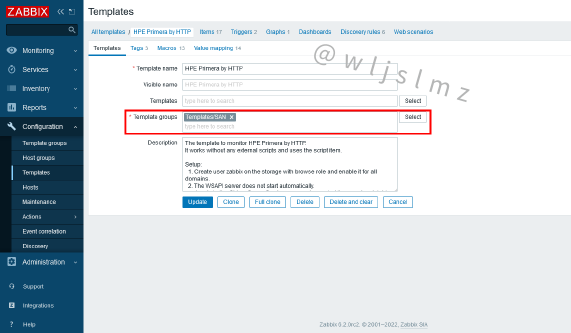
为了简化主机和模板筛选,模板现在分组在模板组中,而不是主机组中:
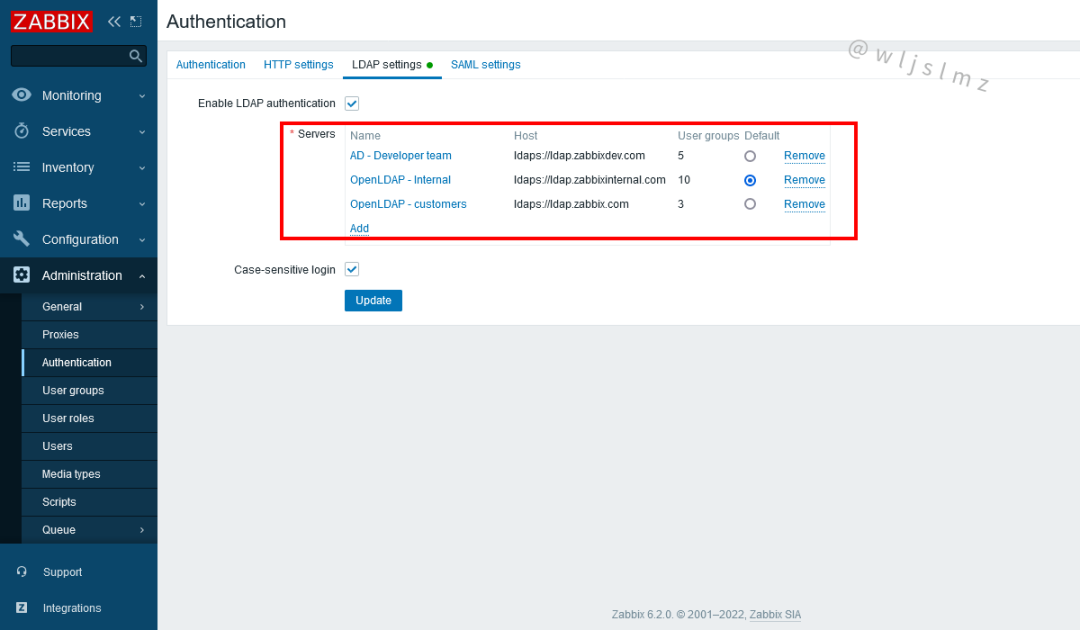
现在可以在Authentication - LDAP settings定义和保存多个LDAP servers:

Zabbix 6.2为最受欢迎的供应商提供了许多新模板:
Zabbix 6.2为GLPI IT资产管理解决方案引入了webhook集成。此webhook可用于将Zabbix中创建的问题转发给GLPi帮助页面。
更多改进功能(部分):
系统基于centos8
[root@localhost~]#cd/etc/yum.repos.d/
[root@localhostyum.repos.d]#rm-rf*
[root@localhostyum.repos.d]#curl-o/etc/yum.repos.d/CentOS-Base.repohttps://mirrors.aliyun.com/repo/Centos-vault-8.5.2111.repo
[root@localhostyum.repos.d]#sed-i-e'/mirrors.cloud.aliyuncs.com/d'-e'/mirrors.aliyuncs.com/d'/etc/yum.repos.d/CentOS-Base.repo
[root@localhostyum.repos.d]#yumcleanall
[root@localhostyum.repos.d]#yumlistall
注意PHP至少7.4,mariadb至少10.5版本:
[root@localhost~]#dnf-yinstallhttpd
[root@localhost~]#dnf-ymoduleinstallmariadb:10.5
无法安装使用如下命令卸载后重新安装,再安装php:7.4*:
[root@localhost~]#dnf-ymoduleresetmariadb:10.5
[root@localhost~]#dnf-ymoduleinstallmariadb:10.5
[root@localhost~]#dnfmodule-yinstallphp:7.4*
查看是否安装成功:
[root@localhost~]#rpm-qa|grepphp
php-cli-7.4.30-1.module_el8.7.0+1190+d11b935a.x86_64
php-common-7.4.30-1.module_el8.7.0+1190+d11b935a.x86_64
php-mbstring-7.4.30-1.module_el8.7.0+1190+d11b935a.x86_64
php-fpm-7.4.30-1.module_el8.7.0+1190+d11b935a.x86_64
php-xml-7.4.30-1.module_el8.7.0+1190+d11b935a.x86_64
php-json-7.4.30-1.module_el8.7.0+1190+d11b935a.x86_64
[root@localhost~]#
[root@localhost~]#cd/etc/httpd/conf.d/
[root@localhostconf.d]#find/-name*vhosts.conf
/var/lib/containers/storage/overlay/bfc56aacd784174064eec717da729908e09fc649a3592743aa020d302b09f6ca/diff/usr/local/apache2/conf/extra/httpd-vhosts.conf
/var/lib/containers/storage/overlay/bfc56aacd784174064eec717da729908e09fc649a3592743aa020d302b09f6ca/diff/usr/local/apache2/conf/original/extra/httpd-vhosts.conf
/usr/share/doc/httpd/httpd-vhosts.conf
复制文件并修改:
[root@localhostconf.d]#cp/usr/share/doc/httpd/httpd-vhosts.conf.
[root@localhostconf.d]#ls
autoindex.confhttpd-vhosts.confphp.confREADMEuserdir.confwelcome.conf

[root@localhostconf.d]#vimhttpd-vhosts.conf
添加内容如下:
<VirtualHost*:80>
DocumentRoot"/var/www/html/zabbix.example.com"
ServerNamezabbix.example.com
ProxyRequestsOff
ProxyPassMatch^/(.*\.php)$fcgi://127.0.0.1:9000/var/www/html/zabbix.example.com/$1
<Directory"/var/www/html/zabbix.example.com">
Optionsnone
AllowOverridenone
Requireallgranted
</Directory>
ErrorLog"/var/log/httpd/zabbix.example.com-error_log"
CustomLog"/var/log/httpd/zabbix.example.com-access_log"common
</VirtualHost>
查看是否有IncludeOptional conf.d/*.conf:
[root@localhostconf.d]#cd..
[root@localhosthttpd]#vimconf/httpd.conf
#搜索/DirectoryIndex,添加index.php
#DirectoryIndex:setsthefilethatApachewillserveifadirectory
#isrequested.
#
<IfModuledir_module>
DirectoryIndexindex.phpindex.html
</IfModule>
#//搜索AddType,添加以下内容
AddTypeapplication/x-httpd-php.php
AddTypeapplication/x-httpd-php-source.phps
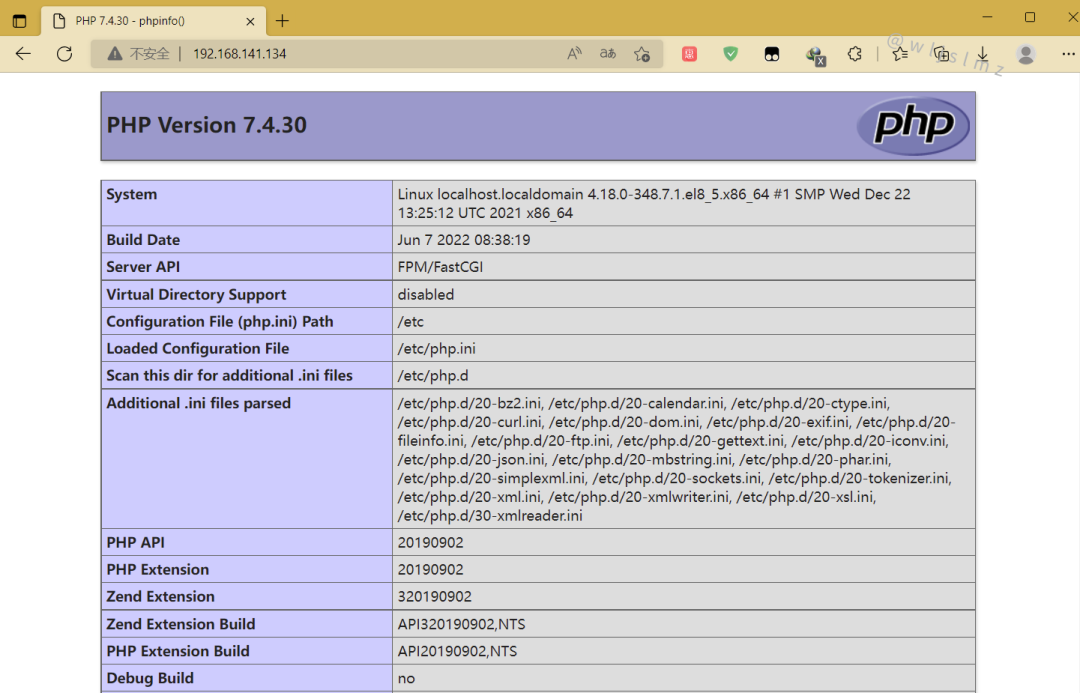
创建测试页面:
[root@localhosthttpd]#mkdir/var/www/html/zabbix.example.com
[root@localhosthttpd]#vim/var/www/html/zabbix.example.com/index.php
<?php
phpinfo();
?>
开启httpd和mariadb服务:
[root@localhost~]#systemctlenable--nowhttpd
[root@localhost~]#systemctlenable--nowmariadb
设置密码:
[root@localhost~]#mysql
MariaDB[(none)]>setpassword=password('long123!');
QueryOK,0rowsaffected(0.000sec)
MariaDB[(none)]>quit
Bye
测试是否可以成功登录MySQL:
[root@localhost~]#mysql-uroot-plong123!
WelcometotheMariaDBmonitor.Commandsendwith;or\g.
YourMariaDBconnectionidis4
Serverversion:10.5.9-MariaDBMariaDBServer
Copyright(c)2000,2018,Oracle,MariaDBCorporationAbandothers.
Type'help;'or'\h'forhelp.Type'\c'toclearthecurrentinputstatement.
MariaDB[(none)]>quit
Bye


[root@localhost~]#systemctlenable--nowphp-fpm
[root@localhost~]#systemctlstatusphp-fpm
●php-fpm.service-ThePHPFastCGIProcessManager
Loaded:loaded(/usr/lib/systemd/system/php-fpm.service;enabled;vendorpreset:disabl>
Active:active(running)sinceThu2022-09-0117:25:53CST;8minago
MainPID:7269(php-fpm)
查看是否有端口没有就进入配置文件编写:
[root@localhost~]#ss-antl
StateRecv-QSend-QLocalAddress:PortPeerAddress:PortProcess
LISTEN0800.0.0.0:33060.0.0.0:*
LISTEN01280.0.0.0:220.0.0.0:*
LISTEN0128*:80*:*
LISTEN0128[::]:22[::]:*
[root@localhost~]#vim/etc/php-fpm.d/www.conf
#把如下配置改为
listen=/run/php-fpm/www.sock
#改后
;Note:Thisvalueismandatory.
listen=0.0.0.0:9000
[root@localhostphp-fpm.d]#systemctlrestartphp-fpm
重新查看端口号,可以看见端口号已经有了:
[root@localhostphp-fpm.d]#ss-antl
StateRecv-QSend-QLocalAddress:PortPeerAddress:PortProcess
LISTEN01280.0.0.0:90000.0.0.0:*
LISTEN0800.0.0.0:33060.0.0.0:*
LISTEN01280.0.0.0:220.0.0.0:*
LISTEN0128*:80*:*
LISTEN0128[::]:22[::]:*
[root@localhostphp-fpm.d]#
关闭防火墙:
[root@localhostphp-fpm.d]#systemctldisable--nowfirewalld
Removed/etc/systemd/system/multi-user.target.wants/firewalld.service.
Removed/etc/systemd/system/dbus-org.fedoraproject.FirewallD1.service.
[root@localhostphp-fpm.d]#setenforce0
[root@localhostphp-fpm.d]#vim/etc/selinux/config
[root@localhostphp-fpm.d]#cat/etc/selinux/config|grepSELINUX=
#SELINUX=cantakeoneofthesethreevalues:
SELINUX=disabled
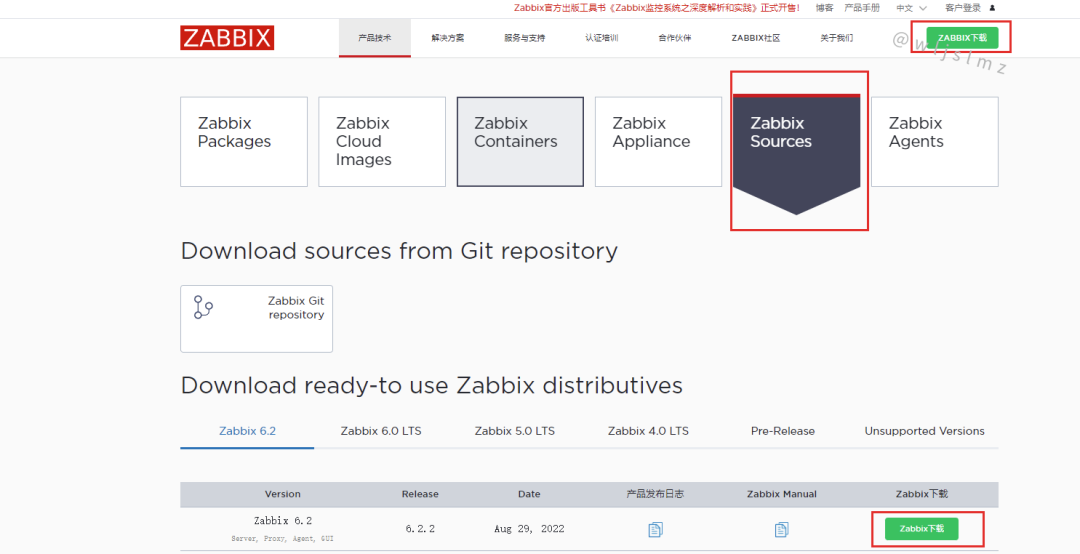
官方网站下载地址:
https://www.zabbix.com/cn/download_sources
[root@localhostconf.d]#cd/usr/src/
[root@localhostsrc]#wgethttps://cdn.zabbix.com/zabbix/sources/stable/6.2/zabbix-6.2.2.tar.gz
....
2022-09-0118:00:30(5.84MB/s)-‘zabbix-6.2.2.tar.gz’saved[34995538/34995538]
[root@localhostsrc]#ls
debugkernelszabbix-6.2.2.tar.gz
[root@localhostsrc]#
安装依赖包:
[root@localhostsrc]#yum-yinstallnet-snmp-devellibevent-devel
安装过程略....
解压安装包并创建用户:
[root@localhostsrc]#tarxfzabbix-6.2.2.tar.gz
[root@localhostsrc]#ls
debugkernelszabbix-6.2.2zabbix-6.2.2.tar.gz

[root@localhostsrc]#useradd-r-d/usr/lib/zabbix-s/sbin/nologin-c"ZabbixMonitoringSystem"zabbix

[root@localhostsrc]#mkdir-p/usr/lib/zabbix
[root@localhostsrc]#chmod770/usr/lib/zabbix
[root@localhostsrc]#chown-Rzabbix.zabbix/usr/lib/zabbix
创建数据库:
[root@localhost~]#mysql-uroot-pzabbix123!
MariaDB[(none)]>createdatabasezabbixcharactersetutf8mb4collateutf8mb4_bin;
QueryOK,1rowaffected(0.000sec)

MariaDB[(none)]>showdatabases;
+--------------------+
|Database|
+--------------------+
|information_schema|
|mysql|
|performance_schema|
|zabbix|
+--------------------+
4rowsinset(0.000sec)

MariaDB[(none)]>createuser'zabbix'@'localhost'identifiedby'zabbix123!';
QueryOK,0rowsaffected(0.000sec)

MariaDB[(none)]>grantallprivilegesonzabbix.*to'zabbix'@'localhost';
QueryOK,0rowsaffected(0.000sec)

MariaDB[(none)]>SETGLOBALlog_bin_trust_function_creators=1;
QueryOK,0rowsaffected(0.000sec)
MariaDB[(none)]>flushprivileges;
上传表,注意你使用的是什么安装就用什么我这里是用mysql:
[root@localhostsrc]#cd/usr/src/zabbix-6.2.2/database/mysql
把表导入数据库中:
[root@localhostmysql]#mysql-uroot-plong123!zabbix<schema.sql
[root@localhostmysql]#mysql-uroot-plong123!zabbix<images.sql
[root@localhostmysql]#mysql-uroot-plong123!zabbix<data.sql

[root@localhost~]#mysql-uroot-plong123!
MariaDB[(none)]>usezabbix
MariaDB[zabbix]>showtables;
....
|widget_field|
+----------------------------+
176rowsinset(0.003sec)
#必须176才是正确的
MariaDB[zabbix]>SETGLOBALlog_bin_trust_function_creators=0;
MariaDB[(none)]>flushprivileges;
MariaDB[(none)]>quit
测试是否可以登录:
[root@localhostmysql]#mysql-uzabbix-pzabbix123!
WelcometotheMariaDBmonitor.Commandsendwith;or\g.
YourMariaDBconnectionidis18
Serverversion:10.5.9-MariaDBMariaDBServer
Copyright(c)2000,2018,Oracle,MariaDBCorporationAbandothers.
Type'help;'or'\h'forhelp.Type'\c'toclearthecurrentinputstatement.
MariaDB[(none)]>quit

[root@localhostmysql]#cd/usr/src/zabbix-6.2.2
[root@localhostzabbix-6.2.2]#dnf-yinstallgccgcc-c++libxml2-devellibcurl-develpcre-developensslopenssl-develgolang-binmake
[root@localhostzabbix-6.2.2]#yuminstallmysql-devel-y
[root@localhostzabbix-6.2.2]#./configure--enable-server--enable-agent--with-mysql--with-libcurl--with-libxml2


Enablewebservice:no#注意这里是否开启
EnableJavagateway:no
LDAPsupport:no
IPv6support:no
***********************************************************
*Nowrun'makeinstall'*
**
*ThankyouforusingZabbix!*
*<http://www.zabbix.com>*
***********************************************************
以上是配置安装后有的配置总结,然后服务端就安装好了就,等一下上传网站的文件
[root@localhostzabbix-6.2.2]#makeinstall
...等待,注意需要安装完成才能操作

[root@localhostzabbix-6.2.2]#cd/usr/local/etc/
[root@localhostetc]#vimzabbix_server.conf
#添加数据库的密码
###Option:DBPassword
#Databasepassword.
#Commentthislineifnopasswordisused.
#
#Mandatory:no
#Default:
#DBPassword=
DBPassword=zabbix123!
开启服务:
[root@localhostetc]#zabbix_server
[root@localhostetc]#zabbix_agentd
[root@localhostetc]#ss-anlt
StateRecv-QSend-QLocalAddress:PortPeerAddress:PortProcess
LISTEN01280.0.0.0:100500.0.0.0:*
LISTEN01280.0.0.0:100510.0.0.0:*
LISTEN01280.0.0.0:90000.0.0.0:*
LISTEN01280.0.0.0:220.0.0.0:*
LISTEN080*:3306*:*
LISTEN0128*:80*:*
LISTEN0128[::]:22[::]:*
[root@localhostetc]#
[root@localhostetc]#cd/usr/src/zabbix-6.2.2/
[root@localhostzabbix-6.2.2]#ls
aclocal.m4compileconfig.subdepcompMakefilemissingui
AUTHORSconfconfigureincludeMakefile.amNEWS
binconfig.guessconfigure.acINSTALLMakefile.inREADME
buildconfig.logCOPYINGinstall-shmansass
ChangeLogconfig.statusdatabasem4miscsrc
[root@localhostzabbix-6.2.2]#cp-aui/*/var/www/html/zabbix.example.com/
cp:overwrite'/var/www/html/zabbix.example.com/index.php'?y
[root@localhostzabbix-6.2.2]#
修改属主:
[root@localhostzabbix-6.2.2]#ll/var/www/
total0
drwxr-xr-x.2rootroot6Nov122021cgi-bin
drwxr-xr-x.3rootroot32Sep122:18html
[root@localhostzabbix-6.2.2]#chown-Rapache.apache/var/www/html/
[root@localhostzabbix-6.2.2]#ll/var/www/
total0
drwxr-xr-x.2rootroot6Nov122021cgi-bin
drwxr-xr-x.3apacheapache32Sep122:18html
[root@localhostzabbix-6.2.2]#ll/var/www/html/
total4
drwxr-xr-x.13apacheapache4096Sep123:10zabbix.example.com
[root@localhostzabbix-6.2.2]#
修改/etc/php.ini的配置并重启php-fpm:
[root@localhost~]#sed-ri's/(post_max_size=).*/\116M/g'/etc/php.ini
[root@localhost~]#sed-ri's/(max_execution_time=).*/\1300/g'/etc/php.ini
[root@localhost~]#sed-ri's/(max_input_time=).*/\1300/g'/etc/php.ini
[root@localhost~]#sed-i'/;date.timezone/adate.timezone=Asia/Shanghai'/etc/php.ini
[root@localhost~]#systemctlrestartphp-fpm
[root@localhost~]#dnf-yinstallphp-bcmathphp-gdphp-mysqlnd
中文安装需要的环境:
[root@localhost~]#dnf-yinstallglibc-commonlangpacks-zh_CN.noarch
选择语言
这里是因为我的系统没有多种语言支持,如果想安装中文需要安装中文安装需要的环境:
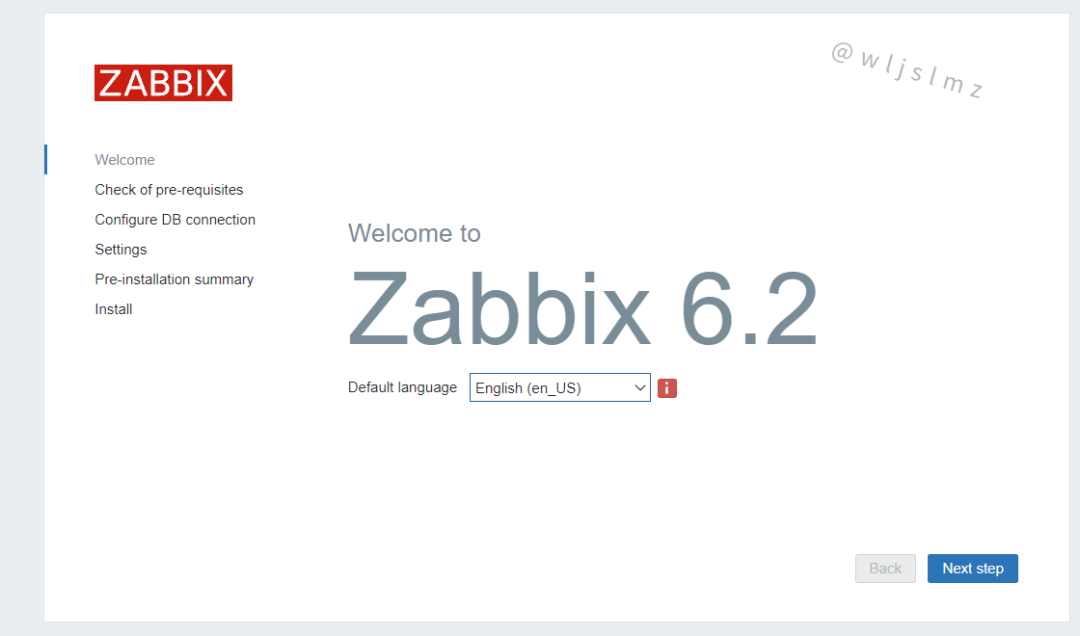
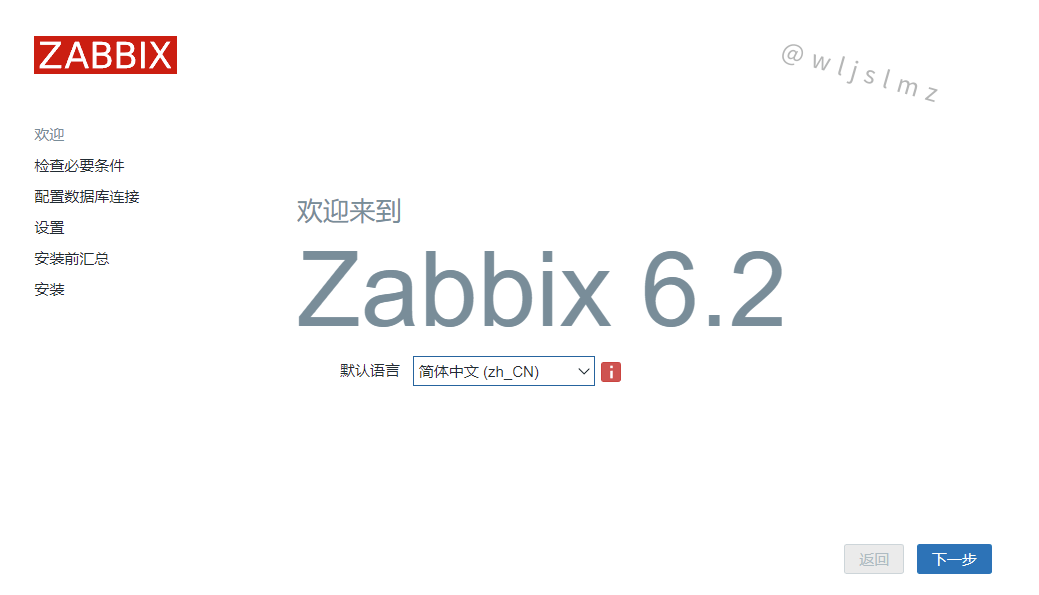
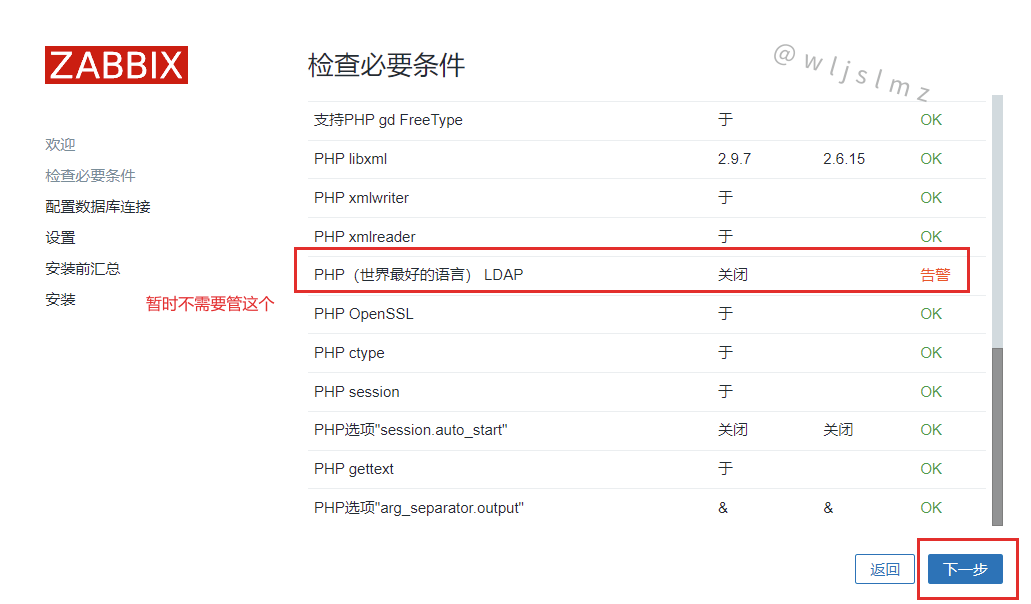
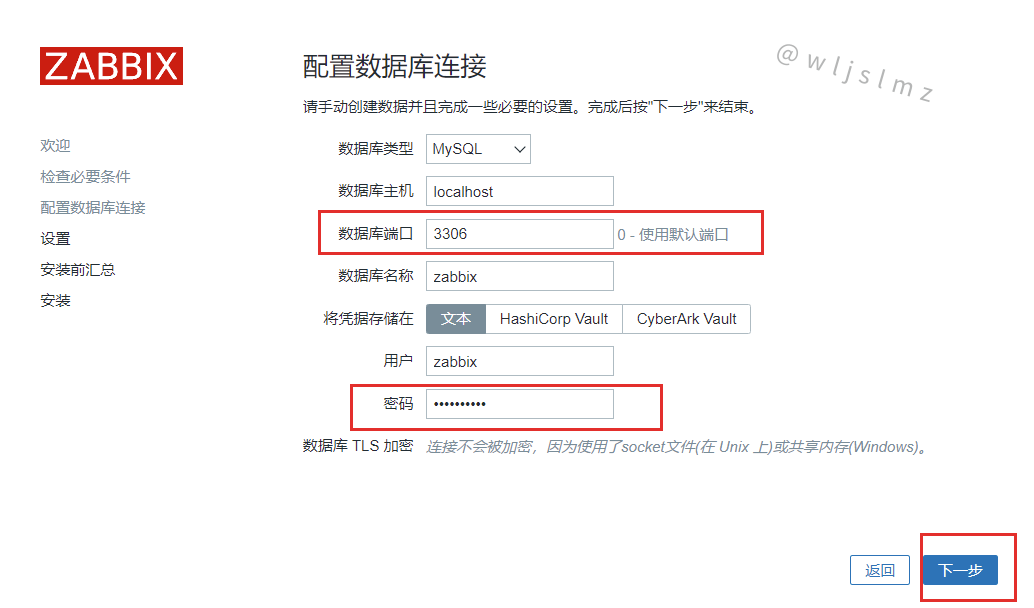
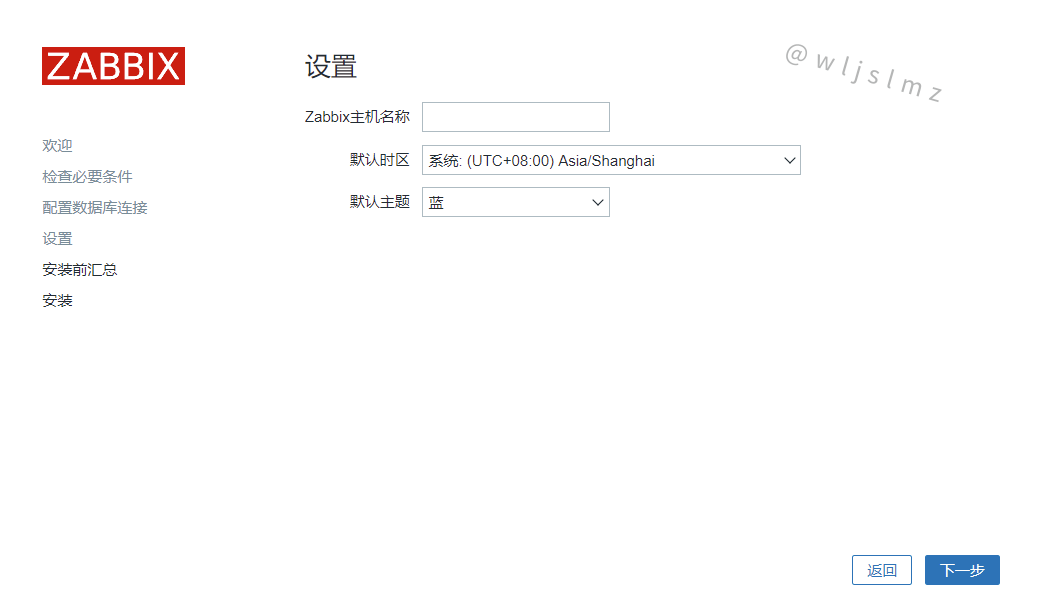
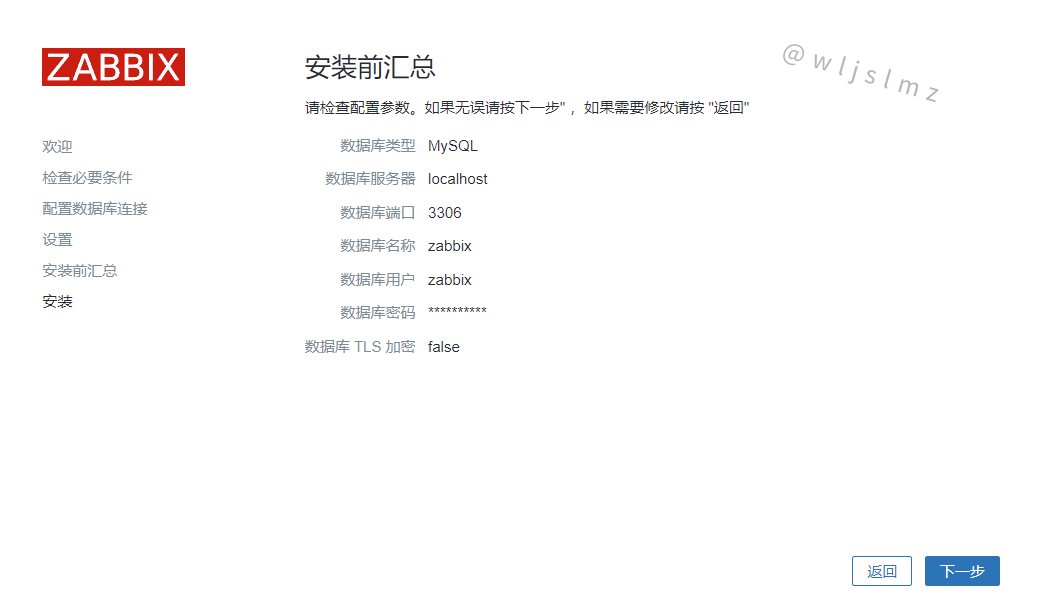
点击【完成】!
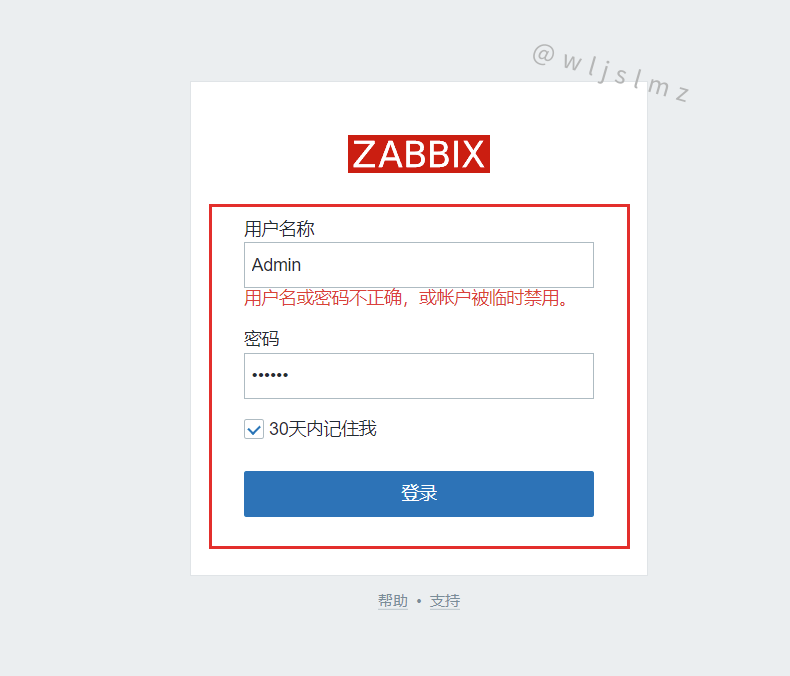
默认的账号名Admin,密码zabbix:
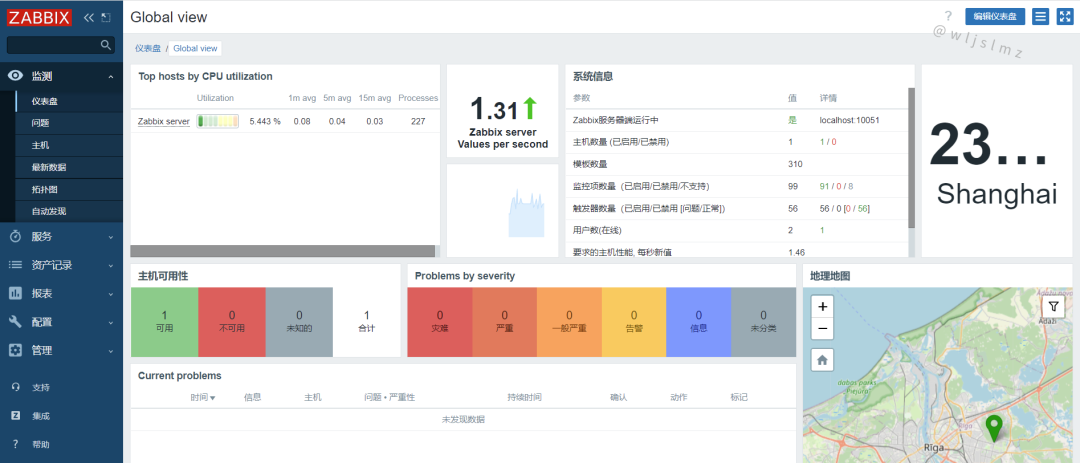
登录成功:
查看现在开启的端口:
[root@localhost~]#ss-anlt
StateRecv-QSend-QLocalAddress:PortPeerAddress:PortProcess
LISTEN01280.0.0.0:90000.0.0.0:*
LISTEN01280.0.0.0:220.0.0.0:*
LISTEN080*:3306*:*
LISTEN0128*:80*:*
LISTEN0128[::]:22[::]:*
编写配置文件:
[root@localhost~]#vim/etc/rc.local
#!/bin/bash#直接在下面添加然后保存
zabbix_server
zabbix_agentd
...
查看执行的文件然后授予执行权限,然后运行:
[root@localhost~]#ll/etc/rc.local
lrwxrwxrwx.1rootroot13Dec22020/etc/rc.local->rc.d/rc.local
[root@localhost~]#chmod+x/etc/rc.d/rc.local
[root@localhost~]#ll/etc/rc.d/rc.local
-rwxr-xr-x.1rootroot502Sep414:47/etc/rc.d/rc.local
[root@localhost~]#source/etc/rc.d/rc.local
查看端口观察服务是否开启:
[root@localhost~]#ss-anlt
StateRecv-QSend-QLocalAddress:PortPeerAddress:PortProcess
LISTEN01280.0.0.0:100500.0.0.0:*
LISTEN01280.0.0.0:100510.0.0.0:*
LISTEN01280.0.0.0:90000.0.0.0:*
LISTEN01280.0.0.0:220.0.0.0:*
LISTEN080*:3306*:*
LISTEN0128*:80*:*
LISTEN0128[::]:22[::]:*
[root@localhost~]#
至此Zabbix6.2就部署完毕了。
Zabbix可以选择主题,这里介绍四个:
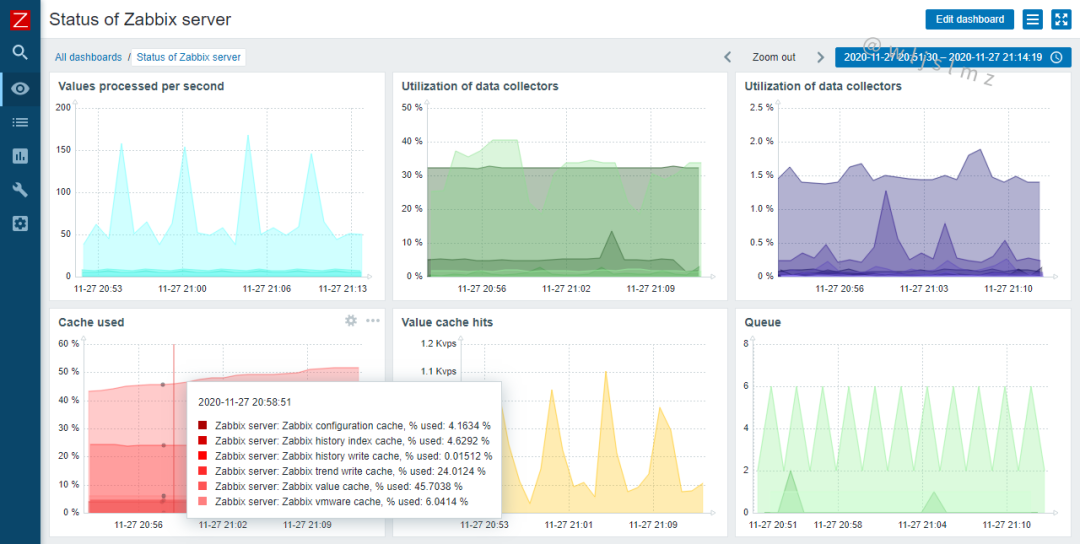
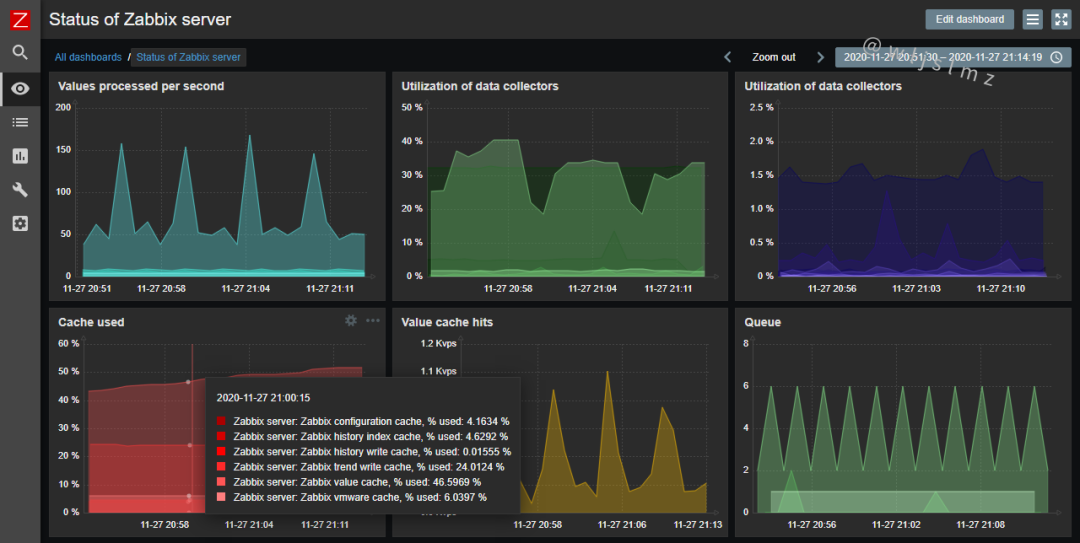
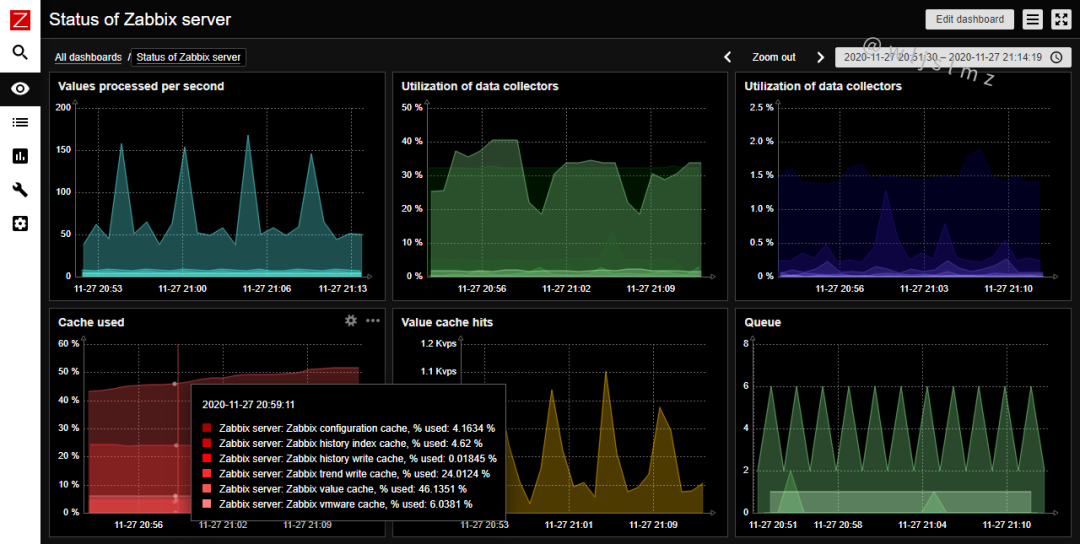
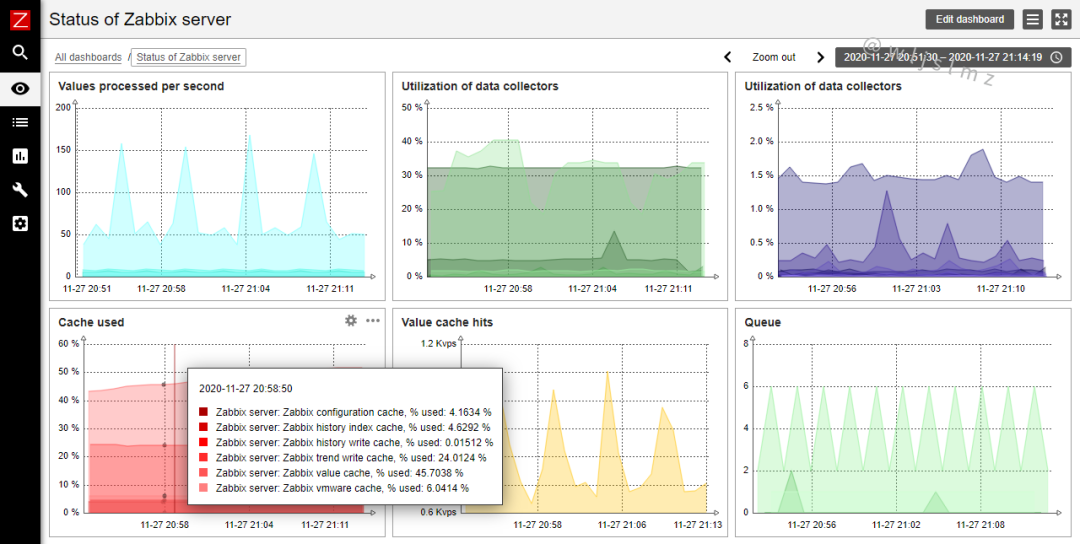
本文给大家介绍了Zabbix的概念、Zabbix6.2新特性,以及如何在CentOS8上部署Zabbix6.2,最后还给大家展示了Zabbix的四个常用的主题,希望本文对您有所帮助,感谢阅读!
新闻来源:开源Linux,文中所述为作者独立观点,不代表icspec立场。更多精彩资讯请下载icspec App。如对本稿件有异议,请联系微信客服specltkj。
暂无评论哦,快来评论一下吧!

2026-07-09

2026-07-11

2026-07-11