
页面加载中,请稍候
来源:芯片之家发布时间:2021-10-131339浏览
询问 AI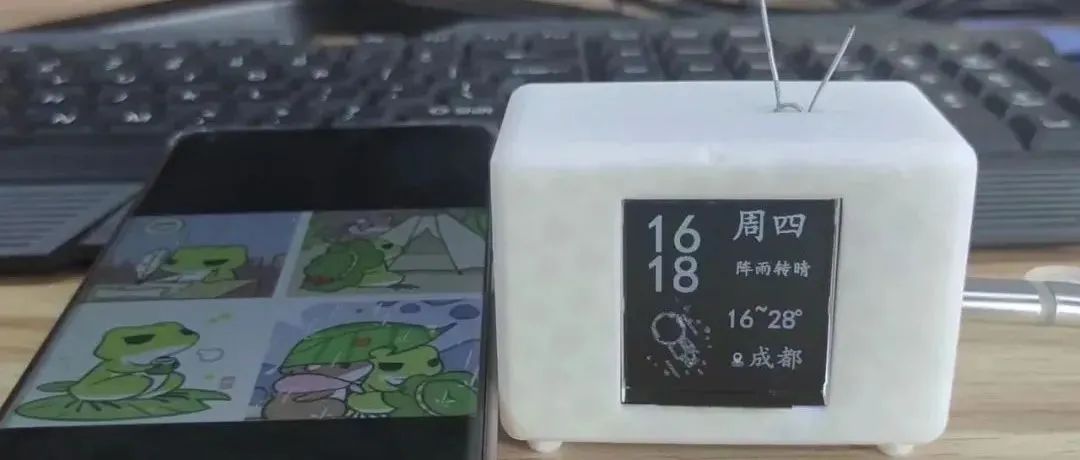

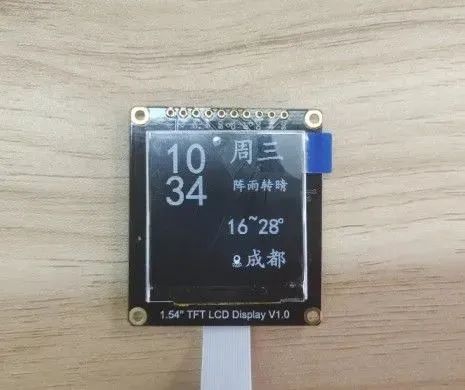
接受当地时间及当地天气,显示在屏幕上;
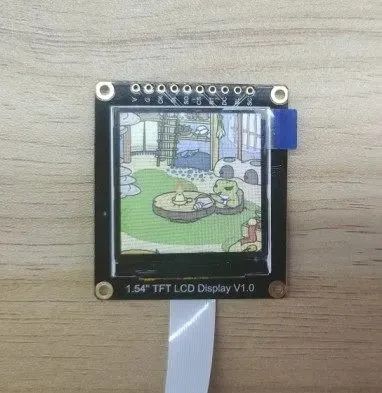
使用ESP32-E的电容触摸引脚,切换屏幕显示内容,显示青蛙旅行图片。
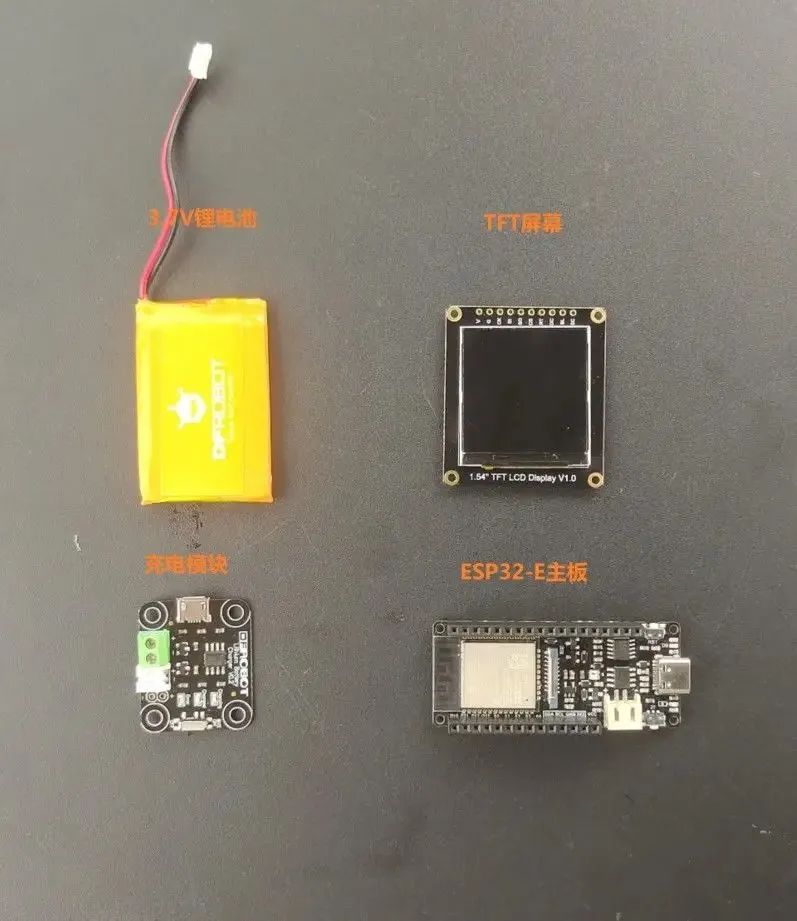
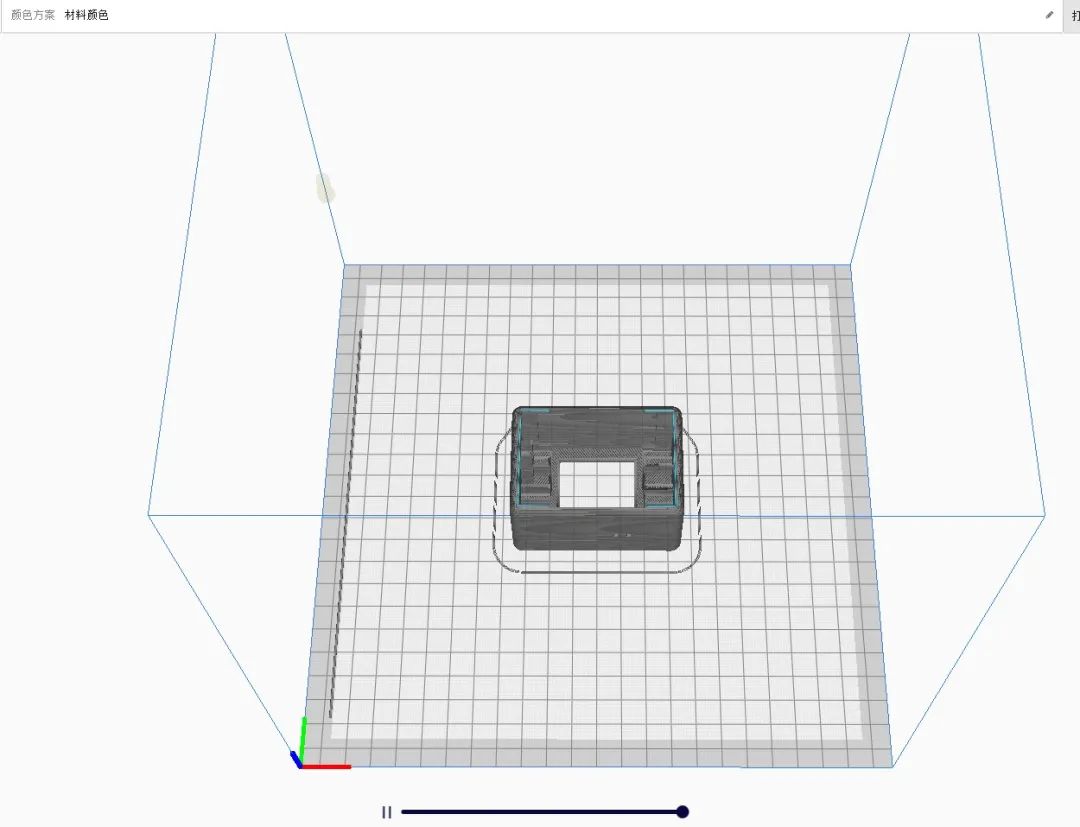
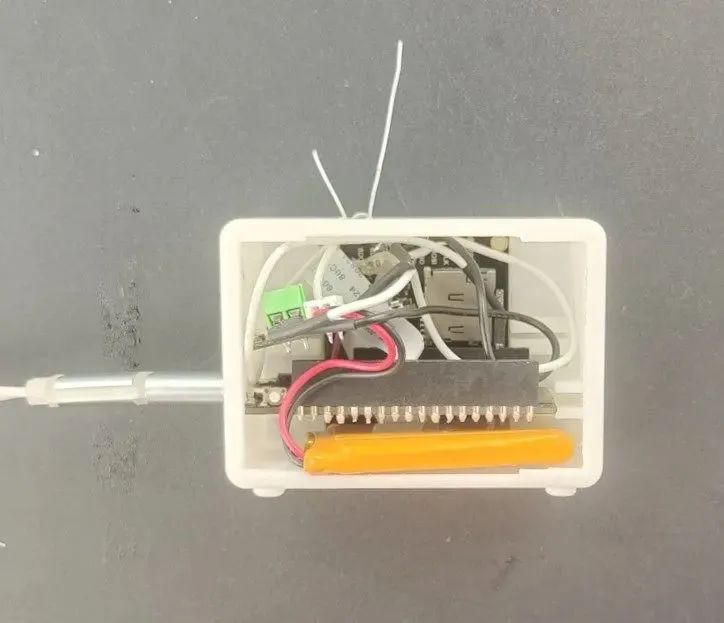
ESP32同时支持STA以及AP模式的WiFi连接。
#include<WiFi.h>
#include<HTTPClient.h>
#include<ArduinoJson.h>
HTTPClient http;
constchar* ssid=dfrobotOffice";
constchar* password=dfrobot2011";
constchar* ntpServer =pool.ntp.org";
constlonggmtOffset_sec =28800;
constintdaylightOffset_sec =0;
DynamicJsonDocumentdoc(1024);
DynamicJsonDocumentdoc1(1024);

voidprintLocalTime(){
structtmtimeinfo;
if(!getLocalTime(&timeinfo)){
Serial.println(Failed to obtian time");
return;
}
Serial.println(&timeinfo,%A, %B %d %Y %H:%M:%S");
}

voidprintLocalWeather(){
http.begin(http://www.weather.com.cn/data/cityinfo/101270101.html");
inthttpCode = http.GET();
if(httpCode == HTTP_CODE_OK){
String pageData = http .getString();
Serial.println(pageData);
deserializeJson(doc,pageData);
JsonObject obj = doc.as<JsonObject>();
String weatherInfo = obj[weatherinfo"];
deserializeJson(doc1,weatherInfo);
JsonObject obj1 = doc1.as<JsonObject>();
String city = obj1[city"];
String temp1 = obj1[temp1"];
String temp2 = obj1[temp2"];
String weather = obj1[weather"];
String cityInfo =地点:"+ city;
String tempInfo =温度: "+ temp1 +~"+ temp2;
String cityWeatherinfo =天气状况: "+ weather;
Serial.println(获得天气情况如下:");
printLocalTime();
Serial.print(cityInfo);
Serial.print(tempInfo);
Serial.println(cityWeatherinfo);
}else{
Serial.println(GET ERR");
}
http.end();
}

voidsetup(){
Serial.begin(115200);
Serial.printf(Connecting to %s",ssid);
WiFi.begin(ssid,password);
while(WiFi.status()!=WL_CONNECTED){
delay(500);
Serial.print(.");
}
Serial.println(CONNECTED");
configTime(gmtOffset_sec, daylightOffset_sec, ntpServer);

printLocalWeather();
}

voidloop(){
if(WiFi.status() == WL_CONNECTED){
printLocalWeather();
}else{
Serial.println(WiFi  Disconnect");
}
}
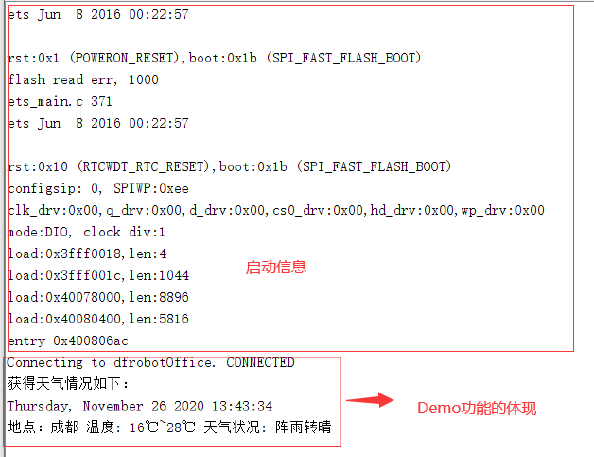
说明:本Demo实现了通过WiFi功能获取网络时间以及通过访问国家气象局提供的http://www.weather.com.cn/datalcityinfo/101010100.html来获取天气情况,本接口中“101010100"为城市代码。
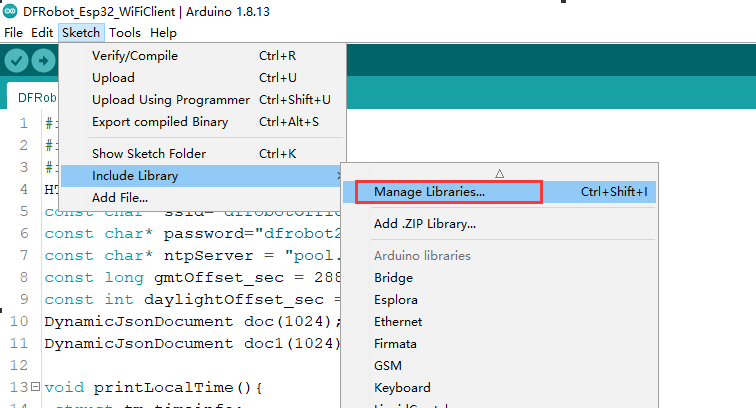
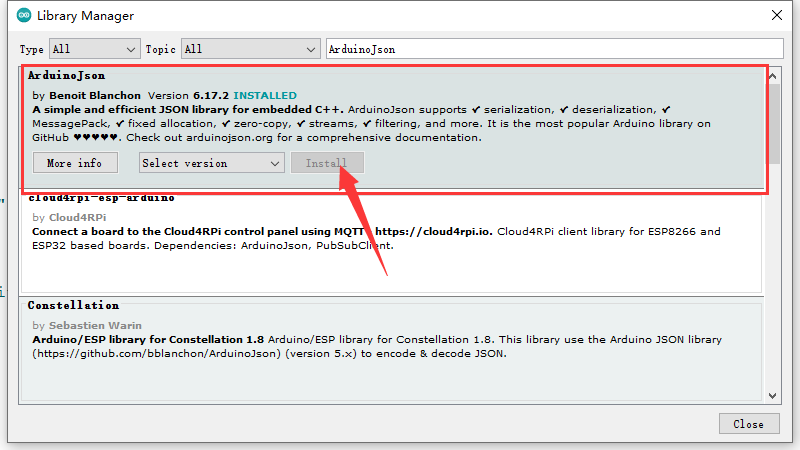
注意:该例程需要下载ArduinoJson库,下载方式如下图:
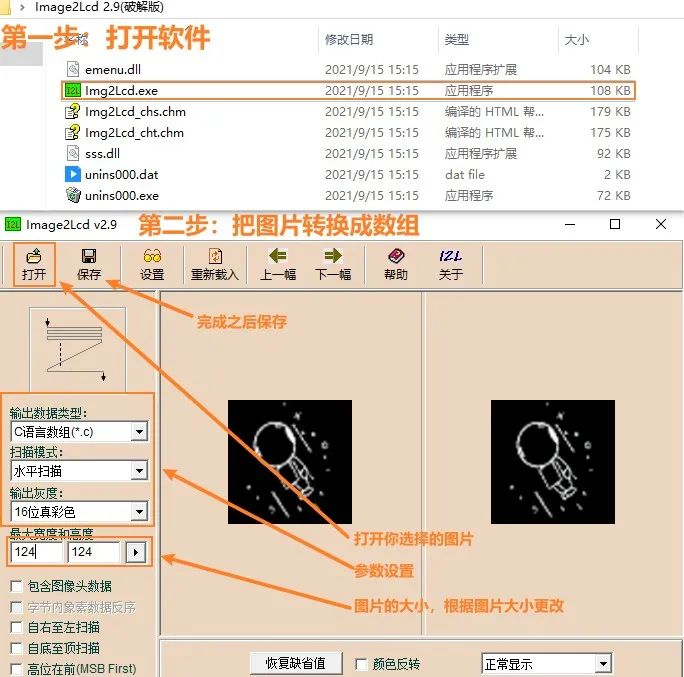
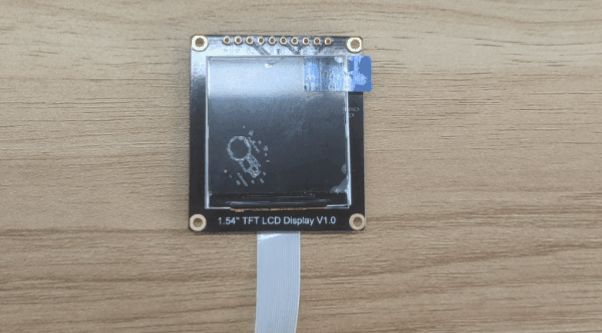
其实是从动态图里面截取下来的4张图片 通过每100毫秒切换一张图片,达到旋转太空人的形态。

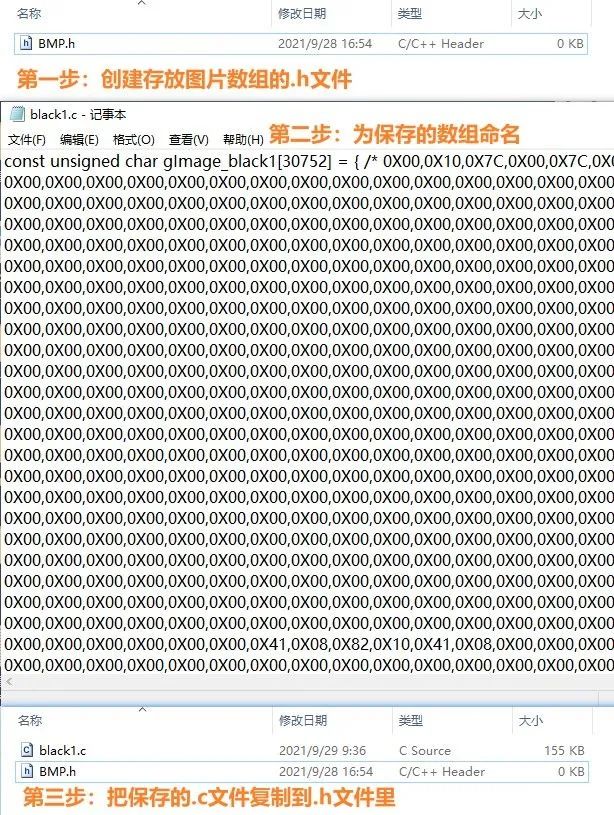
#include<DFRobot_GDL.h>
#includeBMP.h"

#defineTFT_DC  D2
#defineTFT_CS  D6
#defineTFT_RST D3
#definePICNUMBER 6

DFRobot_ST7789_240x240_HW_SPIscreen(*dc=*/TFT_DC,*cs=*/TFT_CS,*rst=*/TFT_RST);

voidsetup(){
screen.begin();


}

voidloop(){
screen.drawPIC(*x=*/0,*y=*/124,*w=*/124,*h=*/124,*bitmap gImage_Bitmap=*/(uint8_t*)gImage_black1);
delay(100);
screen.drawPIC(*x=*/0,*y=*/124,*w=*/124,*h=*/124,*bitmap gImage_Bitmap=*/(uint8_t*)gImage_black2);
delay(100);
screen.drawPIC(*x=*/0,*y=*/124,*w=*/124,*h=*/124,*bitmap gImage_Bitmap=*/(uint8_t*)gImage_black3);
delay(100);
screen.drawPIC(*x=*/0,*y=*/124,*w=*/124,*h=*/124,*bitmap gImage_Bitmap=*/(uint8_t*)gImage_black4);
delay(100);
screen.drawPIC(*x=*/0,*y=*/124,*w=*/124,*h=*/124,*bitmap gImage_Bitmap=*/(uint8_t*)gImage_black5);


}
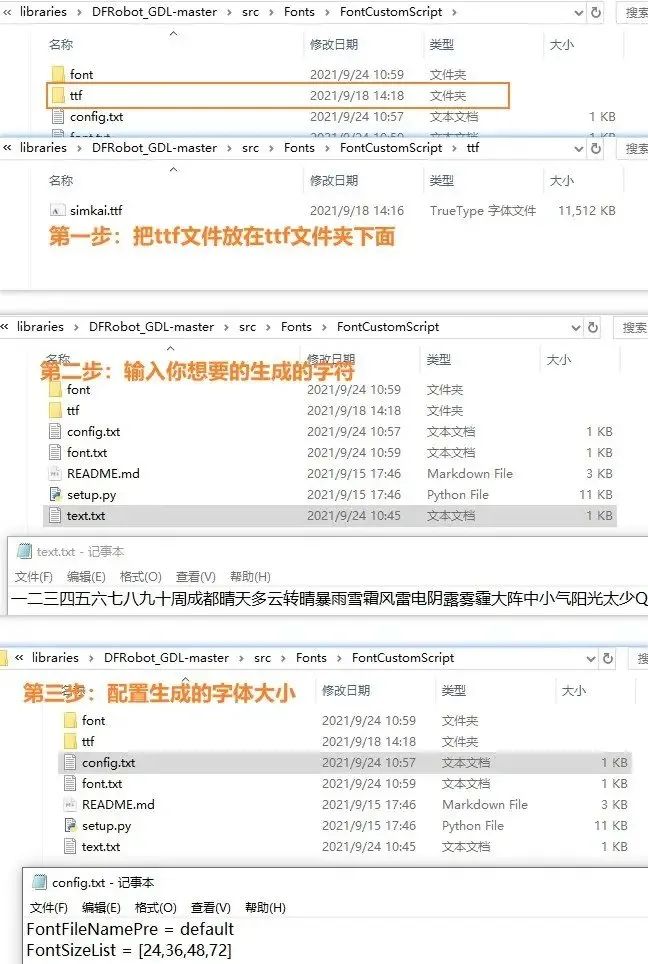
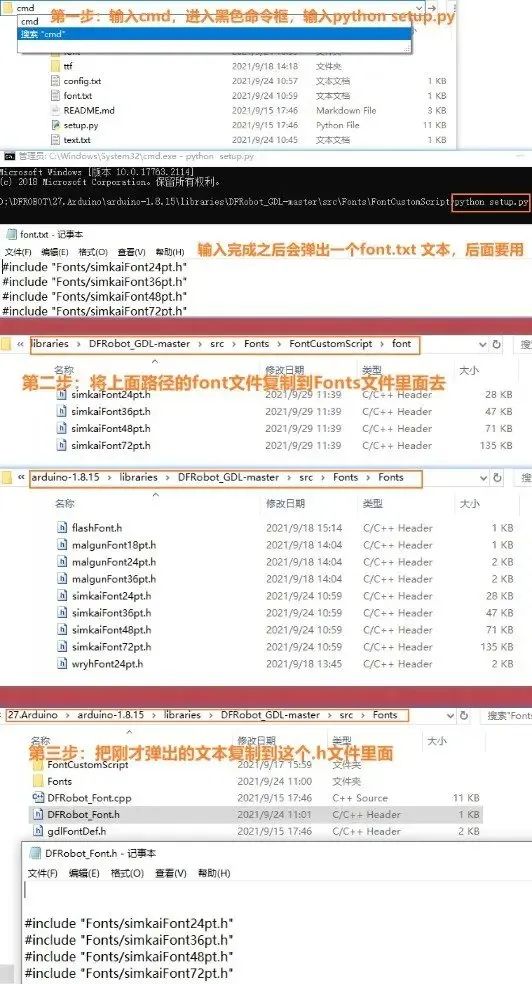
在使用setup.py脚本生成自定义字体之前,需要做如下准备:
把ttf文件放在库文件的对应ttf文件夹下,这里我提供了一个ttf文件,供大家使用。链接获取[5]:
#include <DFRobot_GDL.h>
#include <WiFi.h>
#include <HTTPClient.h>
#include <ArduinoJson.h>
#include "BMP.h"
HTTPClient http;

const char* ssid=dfrobotOffice";
const char* password=dfrobot2011";
const char* ntpServer =pool.ntp.org";
const long gmtOffset_sec = 28800;
const int daylightOffset_sec = 0;
DynamicJsonDocument doc(1024);
DynamicJsonDocument doc1(1024);
#define TFT_DC  D2
#define TFT_CS  D6
#define TFT_RST D3
#define PICNUMBER 6

String weekDays[]={周天",周一",周二",周三",周四",周五",周六"};

DFRobot_ST7789_240x240_HW_SPI screen(/*dc=*/TFT_DC,/*cs=*/TFT_CS,/*rst=*/TFT_RST);

voidsetup() {
Serial.begin(115200);
screen.begin();

Serial.printf(Connecting to %s",ssid);
WiFi.begin(ssid,password);
while(WiFi.status()!=WL_CONNECTED){
delay(500);
Serial.print(.");
}
Serial.println(CONNECTED");
configTime(gmtOffset_sec, daylightOffset_sec, ntpServer);

screen.fillScreen(COLOR_RGB565_BLACK);

}

voidprintLocalWeather(){
http.begin(http://www.weather.com.cn/data/cityinfo/101270101.html");
int httpCode = http.GET();
if(httpCode == HTTP_CODE_OK){
String pageData = http .getString();
//Serial.println(pageData);
deserializeJson(doc,pageData);
JsonObject obj = doc.as<JsonObject>();
String weatherInfo = obj[weatherinfo"];
deserializeJson(doc1,weatherInfo);
JsonObject obj1 = doc1.as<JsonObject>();
String city = obj1[city"];
String temp1 = obj1[temp1"];
String temp2 = obj1[temp2"];
String weather = obj1[weather"];
String cityInfo = city;
String tempInfo =temp1 +~"+ temp2;
String cityWeatherinfo =weather;
Serial.println(获得天气情况如下:");
Serial.print(cityInfo);
Serial.print(tempInfo);
Serial.println(cityWeatherinfo);

struct tm timeinfo;
if(!getLocalTime(&timeinfo)){
Serial.println(Failed to obtian time");
return;
}
Serial.println(&timeinfo,%F %R %u"); // 格式化输出

//显示天气及时间信息
screen.setFont(&simkaiFont72pt );//Set the font to FreeMono12pt7b
screen.setCursor(/*x=*/15,/*y=*/0);
screen.println(&timeinfo,%H");
screen.setCursor(/*x=*/15,/*y=*/55);
screen.println(&timeinfo,%M");
screen.setFont(&simkaiFont72pt );//Set the font to FreeMono12pt7b
screen.setCursor(/*x=*/0,/*y=*/0);
screen.setTextColor(COLOR_RGB565_LGRAY);
screen.setTextWrap(true);
screen.setFont(&simkaiFont48pt );//Set the font to FreeMono12pt7b
screen.setCursor(/*x=*/124,/*y=*/0);
screen.println(weekDays[timeinfo.tm_wday]);
screen.setFont(&simkaiFont24pt );//设置字体大小 为24像素点大小
screen.setCursor(/*x=*/130,/*y=*/70); //设置显示光标
screen.println(cityWeatherinfo);//屏幕显示天气状况,如多云转晴类字样
screen.drawPIC(/*x=*/125,/*y=*/200,/*w=*/24,/*h=*/24,/*bitmap gImage_Bitmap=*/( uint8_t*)gImage_black6);//屏幕显示位置图标
screen.setFont(&simkaiFont36pt );//设置字体大小 为36像素点大小
screen.setCursor(/*x=*/120,/*y=*/135);//设置显示光标
screen.println(tempInfo);//屏幕显示温度信息
screen.setCursor(/*x=*/204,/*y=*/135);
screen.println(°");//显示温度的符号
screen.setCursor(/*x=*/150,/*y=*/190);
screen.println(cityInfo);//屏幕显示你所在城市的位置信息

}else{
Serial.println(GET ERR");
}
http.end();
}


voidloop() {
if(WiFi.status() == WL_CONNECTED){
printLocalWeather();
}else{
Serial.println(WiFi  Disconnect");
}

}
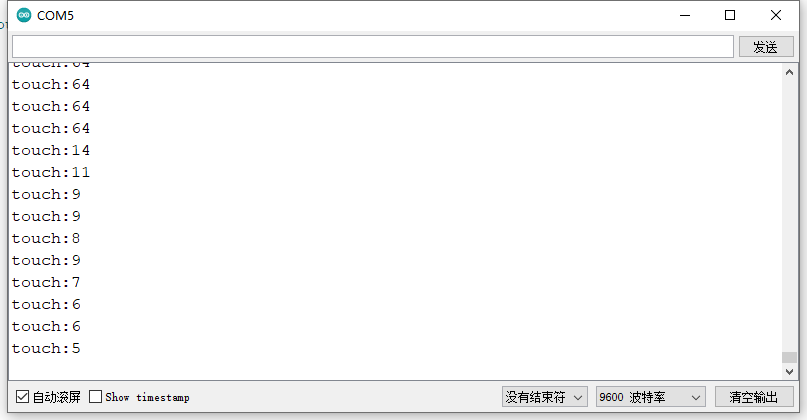
ESP32提供了电容触摸传感器的功能, 共有T0,T2~T9 共 9个touch传感器可用.分别对应引脚4、2、15、13、12、14、27、33、32. 无需设置PinMode,touchRead()返回值为0~255. 触摸强度越大,返回值越小。烧录此例程,将使用4/D12引脚作为触摸按键,并通过串口监视器返回触摸值。
voidsetup()
{
Serial.begin(9600);
}

voidloop()
{
Serial.printf(touch:%d\n",touchRead(4));
}

#include <DFRobot_GDL.h>
#include "BMP.h"

#define TFT_DC  D2
#define TFT_CS  D6
#define TFT_RST D3
#define PICNUMBER 6
uint8_t randNumber;
DFRobot_ST7789_240x240_HW_SPI screen(/*dc=*/TFT_DC,/*cs=*/TFT_CS,/*rst=*/TFT_RST);

uint8_t printfrog(uint8_t number){
switch(number){
case0:
screen.drawPIC(/*x=*/0,/*y=*/0,/*w=*/240,/*h=*/240,/*bitmap gImage_Bitmap=*/( uint8_t*)gImage_qingwa1);//显示的随机图片
delay(2000);
break;
case1:
screen.drawPIC(/*x=*/0,/*y=*/0,/*w=*/240,/*h=*/240,/*bitmap gImage_Bitmap=*/( uint8_t*)gImage_qingwa2);
delay(2000);
break;
case2:
screen.drawPIC(/*x=*/0,/*y=*/0,/*w=*/240,/*h=*/240,/*bitmap gImage_Bitmap=*/( uint8_t*)gImage_qingwa3);
delay(2000);
break;
case3:
screen.drawPIC(/*x=*/0,/*y=*/0,/*w=*/240,/*h=*/240,/*bitmap gImage_Bitmap=*/( uint8_t*)gImage_qingwa4);
delay(2000);
break;
case4:
screen.drawPIC(/*x=*/0,/*y=*/0,/*w=*/240,/*h=*/240,/*bitmap gImage_Bitmap=*/( uint8_t*)gImage_qingwa5);
delay(2000);
break;
case5:
screen.drawPIC(/*x=*/0,/*y=*/0,/*w=*/240,/*h=*/240,/*bitmap gImage_Bitmap=*/( uint8_t*)gImage_qingwa6);
delay(2000);
break;
}

}


voidsetup() {
Serial.begin(115200);
screen.begin();
}

voidloop() {

if(touchRead(4)<=20)
{
screen.fillScreen(COLOR_RGB565_BLACK);
Serial.println(摸到了");
randNumber =random(PICNUMBER);
Serial.println(randNumber);//随机数的打印
printfrog(randNumber);

}
else{
Serial.println(没有摸到");
}
}
点击左下角阅读原文查看
从这次的小应用中我学会了很多东西,比如在tft屏幕上显示图片、动态图、中文。如何抓取天气信息,如何把抓取到的信息显示到tft屏幕上。
所以去旅行吧,不理会繁杂的琐事,自由自在地,去体验一个城市,一段故事,留下一片欢笑。
原文链接:https://mc.dfrobot.com.cn/thread-311127-1-1.html
项目作者: 创客达闻西
首发于DF创客社区
开源项目,转载请务必注明项目出处与原作者信息图纸链接:https://mc.dfrobot.com.cn/forum.php?mod=attachment&aid=MTMzNjgyfGE2NzAxYmY2YzNkOTc5MDk0MTJmNjkyOTNmOWIxNzJhfDE2MzM5MzQwNTM%3D&request=yes&_f=.rar
[2]DFRobot_GDL库文件:https://codeload.github.com/DFRobot/DFRobot_GDL/zip/master
[3]使用Firebeetle Board-ESP32-E:https://wiki.dfrobot.com.cn/_SKU_DFR0654_FireBeetle_Board_ESP32_E
[4]下载库文件:https://mc.dfrobot.com.cn/thread-1854-1-1.html
[5]ttf文件:https://mc.dfrobot.com.cn/forum.php?mod=attachment&aid=MTMzMzIzfGQ5NDRmNTVhNjk5MGVlYzI4NjExNTk5ZDZmMjc3YjFlfDE2MzM5MzQwNTM%3D&request=yes&_f=.rar
新闻来源:芯片之家,文中所述为作者独立观点,不代表icspec立场。更多精彩资讯请下载icspec App。如对本稿件有异议,请联系微信客服specltkj。
暂无评论哦,快来评论一下吧!
2026-07-24

2026-07-22
2026-06-29